


HTML, which stands for Hypertext Markup Language, is the backbone of the web. It is the language that allows you to create web pages by marking up content with special tags and characters. In this step-by-step guide, we'll demystify HTML and make it easy for you to understand and use.
Level 1: Introduction to HTML
HTML is like a translator for computers. It converts human-readable language into binary code that computers can understand and display as web pages. Just as we humans use languages like English or Hindi, computers use HTML to communicate the structure and content of a webpage.
HTML serves as the building blocks of a website. When you write an HTML document, you're essentially providing instructions to the computer on how to display the page. It tells the computer what elements to include, such as headings, paragraphs, lists, tables, and images.
Level 2: Elements and Tags
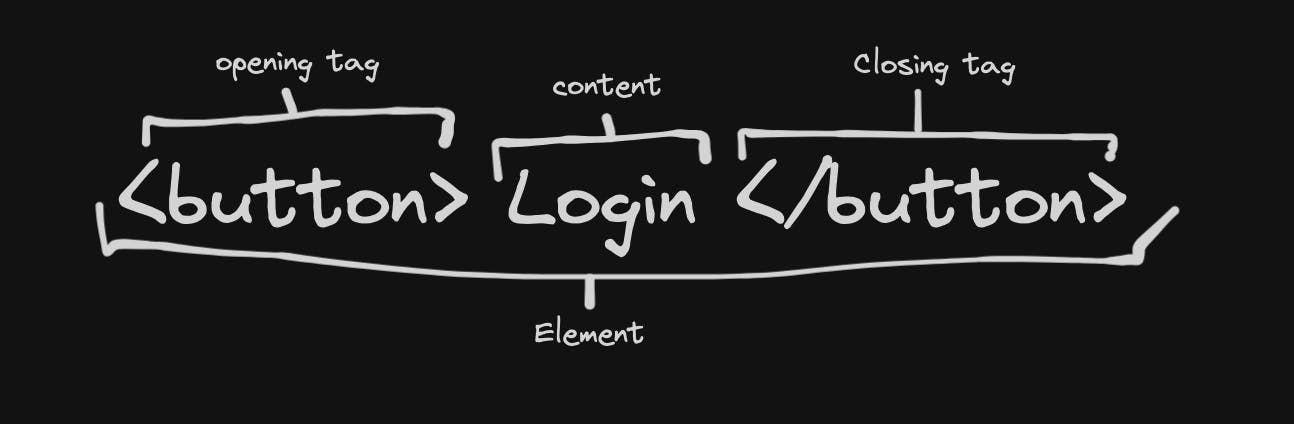
HTML documents are composed of elements, which are created using tags. Tags are like labels that indicate how different parts of a webpage should appear and where they should be placed. For example, a tag can be used to create a heading, another for an image, and so on.
Here are some commonly used HTML tags:
<h1>to<h6>: Headings of different levels<p>: Paragraphs<hr>: Horizontal lines<a>: Links<img>: Images<ul>and<ol>: Unordered and ordered lists
Attributes can be added to tags to provide additional information. For example, the href attribute is used in the <a> tag to specify the target URL of a link.
Level 3: The Basic Structure of an HTML Document
Every HTML document has a basic structure. It starts with a <!DOCTYPE HTML> declaration that defines the version of HTML being used. The document is enclosed in <html> tags, with a <head> section that contains metadata and a <body> section where the visible content resides. Here's a simplified structure:
<!DOCTYPE HTML>
<html>
  <head>
    <title>Document Title</title>
  </head>
  <body>
    <!-- Content goes here -->
  </body>
</html>
Level 4: Working with Links
Links are a fundamental part of the web. In HTML, links are created using the <a> (anchor) element. You can link to other web pages, email addresses, phone numbers, and files using this tag. For example:
<a href="<https://www.example.com/>">Visit Example.com</a>
<a href="mailto:info@example.com">Send an email</a>
<a href="tel:+1-555-555-5555">Call us</a>
<a href="file.pdf">Download the PDF</a>
Level 5: Lists
HTML supports different types of lists, including ordered lists, unordered lists, and definition lists. Here's how you create them:
Ordered List
<ol>
  <li>Item 1</li>
  <li>Item 2</li>
  <li>Item 3</li>
</ol>
Unordered List
<ul>
  <li>Item 1</li>
  <li>Item 2</li>
  <li>Item 3</li>
</ul>
Definition List
<dl>
  <dt>Data</dt>
  <dd>Definition of data</dd>
  <dt>Database</dt>
  <dd>Definition of database</dd>
</dl>
Level 6: Working with Images
Images can be added to web pages using the <img> tag. You specify the image source using the src attribute and provide alternative text using the alt attribute for accessibility.
<img src="path/to/image.jpg" alt="Description of the image">
Level 7: Creating Forms
Forms are used for user input and interaction on websites. You can create forms in HTML using the <form> element. It can contain various form elements like text fields, checkboxes, radio buttons, and dropdown menus. Here's a basic form example:
<form action="#WhereToSubmitData">
  <h2>Contact Info</h2>
  <p>Name: <input type="text" id="username" name="username"></p>
  <p>Male: <input type="radio" id="username" name="username">
     Female: <input type="radio" id="username" name="username"></p>
  <p>Address: <textarea name="Address" id="add" rows="10" columns="100"></textarea></p>
  <p>Email: <input type="email" id="email" name="ema"></p>
  <p>Pincode: <input type="number" id="pincode" name="pin"></p>
  <p>Card Type: <select name="card_type" id="bank_card">
    <option value=""></option>
    <option value="VISA">VISA</option>
    <option value="RUPAY">RUPAY</option>
  </select></p>
  <input type="submit" value="Submit">
</form>
Level 8: Semantic Elements
HTML offers semantic elements that provide meaning to both browsers and developers. These elements make your web content more accessible and comprehensible. Examples of semantic elements include <header>, <nav>, <main>, <article>, <section>, <aside>, and `<footer>.
Using these elements helps structure your content in a way that is easily understandable to users and search engines.
Level 9: Id and Class Attributes
HTML elements can be identified and styled using id and class attributes. An id is unique to a single element and is typically used for unique identification. A class can be applied to multiple elements to apply the same styling.
For example, in CSS, you can select an id with #my-id and a class with .highlight.
Level 10: Advanced HTML
HTML provides flexibility in creating various types of input elements using the type attribute in the <input> tag. You can switch between input types such as text, password, email, number, date, checkbox, radio, and more by changing the type attribute value.
This adaptability allows you to customize input fields for different use cases without altering the HTML structure.
The best Reference Document that I found on the internet is by Google. Scan entire documentation quickly, no need to learn it, during the assignment & revision period we will eventually learn those things.
https://web.dev/learn/html/welcome
After Scanning the above document, you can proudly say you are an expert in HTML. Let's Move to CSS!
For Assignment Github: https://github.com/vijeet-shah/90-Code-Hard